


I'm going to try to make this as simple as possible for zone + weight shipping (not using flat rate packaging).
Step 1 is to get to the shipping tab - click the tab labeled shipping (highlighted in red) below:

That brings up this screen:

Follow the steps...the link you need to go to is:
State & International Shipping Guides
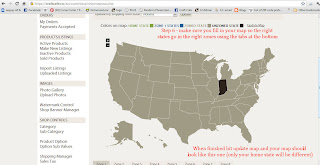
Pick your state from the list - keep it open in a new tab or new window (tip if you have windows7 you can have two windows open side by side using the (windows ICON key + the left or right arrow buttons to assign a window to either side of your screen. - you'll see my example in a bit)
In this main screen click on the US MAP - add in the states per your zone shipping guide from the blog. Your map should look something like this:

Now go back to the shipping tab at the top of the page (the one you started this tutorial with)
and do as this picture tells you - click the link above the red text
and do as this picture tells you - click the link above the red text

That brings up this screen (read the red text)

Clicking the add default USPS values - brings you THIS:

**NOTE** if you need to add in handling charges - don't do it here - you can do it in your listings
Go back to the shipping tab at the top of the page again
This time click on the link UNDER the US map (see red text)

That brings up THIS screen:

Click the Add Priority USPS values - and get this:

Now go to your shop and either edit an item or create a new listing,
when you get to the shipping area (see red text on next image)

Finish your listing by completing all other areas and then click update & activate. Your shipping should be all set.
If you need or want someone to verify your shipping for you, ask a friend or you can always email carrie@craftcafe.co and I'll be happy to check and make sure your shipping is fixed.
If you need or want someone to verify your shipping for you, ask a friend or you can always email carrie@craftcafe.co and I'll be happy to check and make sure your shipping is fixed.
That's all for this tutorial.
-Carrie-
No comments:
Post a Comment