Showing posts with label how-to. Show all posts

6.21.2012

Tutorial: Shop Front Manager/Feature Items


So you've noticed a new thing when you log in to your shop admin area. 
That's right! You asked for it. Here's a way to feature some items in your shop. And its rearrangeable!


***NOTE***
As of the time I posted this tutorial -if you're having issues in any step of this and are using internet explorer you may have troubles - please try another browser (It is verified to work in: Firefox, Chrome and Safari but some areas in IE may not work). I will update this blurb if this changes.
------------------------------------------------------------------------------------
Here's how you use it - this is the first thing you'll see when you see your active items in shop admin (default shop admin screen)


Notice the red highlighted portion - make note of this you'll be coming back here later.

For now point yourself to shop settings (see image):


That brings up this screen - scroll about half way down the page to get this:
The red highlighed area is where you want to be.

Now you have 3 choices on how you want your SHOP FRONT to look.
(This only applies to the front of your shop, it does not affect category or browsing within your shop)
Basic store front - DO NOTHING - just leave it as the default  - that's what everyone's is set to as default
Basic + feature a few - you can choose to feature a smaller # of items 4-8 usually.
Full Feature - your main shop default like you saw when you started this today is gone and you can arrange 100% of the items you choose to feature (up to 24 items).

the big RED arrow points to the drop down menu to choose type of shop feature (or not)
Read the definitions of each type to determine which you want to choose.

Below that is how many items you want to feature. that is also a drop down.
Once you have this set go back to your shop admin area by clicking "ACTIVE LISTINGS" from the left side menu.

Return to this screen:


Under the images I have shown you'll see a new button "FEATURE" (its under EDIT/COPY/INACTIVATE) - this button exists on every item in your shop.
You go through and click feature on the # of items you chose from the previous step. - it will change from 'feature' to 'added' - clicking added will unfeature that item and return it to its default state.

Once you have your desired quantity click this button - see image for highlighted spot (reads "CLICK HERE") click that.

You'll be taken to a special page where you can re-arrange the items you featured to be in the order you want.
My 4 featured images are shown here:


Click on an image and drag it to whichever spot you want it in, and drop it. Then when you have your featured items arranged how you want - click save list order.

Now when you go to MYSHOP or view your shop's page you'll see something like this:


This is my shop with 4 featured listings and the rest of my listing area available. Note I changed the order of my featured items from the previous image.

That's it.
-Carrie-


6.18.2012

Tutorial: Banner Manager

So you've gotten a banner made or you made one yourself - or several banners you want to change out?
We can help with that!

Welcome to the Banner Manager tutorial
This will walk you through as though you do not have a banner set up yet.
Once you're in your shop admin area click the link titled "Banner Manager" on the left hand menu - as highlighted in the photo below.

Clicking Banner Manager brings up this page:


Click Select Images and pick your banner file from where its stored on your hard drive
you'll get a window like this:

This shows I've added two files to be uploaded.
Next we click UPLOAD IMAGES
The upload will progress and you'll see it say 100% DONE next to each image you upload.
You'll also note at the top of the page just above UPLOAD SHOP BANNER is a thing that says to refresh after upload. Click that and you get:


This shows the 2 different banners I uploaded. I chose the latter one this time and you can see yours once you set one banner to active - by clicking MYSHOP at the top of the page.

Here's mine:


That's it. You now have a banner for your shop.
-Carrie-


Tutorial: Uploading .csv file


Many have stated they're having trouble with the uploading of their .csv file from etsy or other sites.

This is a very simple tutorial/walk through of how to find these in your shop.

When in your shop click "Upload products"


That will bring up this screen:

Click: Upload file: choose the .csv file you downloaded from etsy from wherever it is on your hard drive.

Then click the 2nd button - upload csv products.
The page will refresh and you'll get the appearance of being back on the same page...

This time click the underlined "HERE" at the top of the page.

That brings up your inactive uploaded products window:
*Note* images and items are not mine I was testing someone's .csv file for them and wanted to show what a proper upload looks like.

If you've done the steps from part 1 & 2 before - you probably have a TON of inactive products - many which are duplicates. To save yourself headache & hassle - click the CLEAR all csv products - and start this tutorial over again. That way you have only 1 set of your uploaded items. Which you can then edit and publish.

Just remember you do have to go through each listing to edit categories & such.

If you have any other questions about uploading .csv files just ask one of us on LIVE HELP or email carrie@craftcafe.co (evenings) or service@craftcafe.co (days)
-Carrie-


Overview - How to Add Coupons

This image provides an overview of what to do and what you can't do with the coupons section of our site. 


Here's an update: Coupons are still not 100% done but its closer to being done.

Explanation of coupon types:
Whole Shop: this is a code you can set - to give different discounts to different groups of people - but it applies to the whole shop. You can choose % off or $ off. So if you want to give $5 to your friends - you can give them one code, and you want to give 40% off to your fans - you give them another code.
For this type of code you create the code & share the code. The customer applies the code at checkout and its off their whole order from your entire shop. Once you create the code you DO NOT have to apply it to listings. ONLY the individual product discounts must be applied to individual listings.

Individual product discount: this is like putting certain items on sale to EVERYONE. That is every item you have a product discount on - shows as on sale to everyone who looks at that item in your shop. This can lead to more spur of the moment purchases.***** IF You choose this type and want to apply it to some of your items, YOU MUST go into the products you want it to apply to, EDIT the products (2nd to last item in the edit product area) pick the discount you wish to apply and then click UPDATE & PUBLISH on your item to make sure it applies to your item. You have to do this manually at this time for each item you wish to add the discount to (and remove if you want to remove it early). Sorry there's no way to mass apply discounts yet.


**NOTE** there are plans for a 3rd type but I don't have full details yet. Most likely this will be an individual product discount - but that you give customers to enter at checkout (instead of everyone seeing an item on sale). (per discussions with our programmer).


This is just a temporary answer - as soon as the coupon area is 100% done I will complete a full tutorial.
-carrie-

6.17.2012

Tutorial: Product Options & Variants


Many sellers offer products that can be customized to their customer's individual liking without needing to list a ton of separate items. 

Using Craft Cafe's product options & variants section will help you the seller customize your listings to give your buyers the most product choices with the least amount of work.

Step 1 - point your browser to here: https://craftcafe.co/account/shop/variant.php
you'll get this screen:


Step 2 - You'll need to name your option(s). This tutorial shows me adding product options for my items - I do jewelry, photography and digital art. So your option names will differ from mine (or may be the same in some cases).
Make sure you click the ADD+ button once for each type of option you offer. [note at this time you can only pick one option type per listing]


Like the photo shows once you get all your option categories listed click the link at the top to go to the product values page - shown here:


If I click ADD+ next to anklet length - I can add an option variant to the list. See image below for my list of anklet lengths and more info for the next step. Make sure you click SAVE next to each variant. You can click ADD+ several times to get yourself a list of blank slots to add all at once and then click save after each - its just a flicker update not a page refresh so you don't have to worry about losing a lot of typed data
Description can be anything or you can leave it blank, examples: if you have fragrances you can give a description of each fragrance here or if its a t-shirt or skirt size you can give those details here.

Now when you get all your various options filled with variants and all are saved you can go in and edit an item and on the very last item of edit item or create new item page is the product option selection box.
Depending on your item click the drop down and select the option you have that applies to that item and finish your listing.

*Note if you have a special product option like higher end fragrances or something create a separate longer list for ones that include BOTH basic and higher end options - since at this time there isn't a way to add two options per listing yet.
-carrie-


Tutorial: Adding Your Social Media Links

Some of you have expressed difficulty in adding your social media links this simple tutorial will show you how

First point your browser here: https://craftcafe.co/account/shop/account.php
About 1/2 way down the page you'll get this - and I've highlighted the area for adding your social media links in red.

Type in your first link (Links shown here are for my links - use your own for your social media links):
See here:

And click ADD+ (brings up this):


Change the site name & link in the first row and hit add+ again adding a new link
Repeat as often as needed for however many links you wish to post:
Here is my completed list - this shows proper formatting for links as well.
If you've added an item and want to change the name or fix a link - REFRESH the page (ctrl+R - to reload) then it'll show the list in alphabetical order and give you the option to edit (UPDATE) or delete (X) your links.

They appear in alphabetical order - this is the only option - you can't arrange them to suit your preferences sorry:

That's it.
-Carrie-

6.14.2012

Tutorial: Shipping Item Priced Shipping (and free shipping)


This tutorial will cover some of the basics of getting into your shipping management area:

Shipping can be a pain in the butt for any business. Hopefully this tutorial will help you figure out what shipping option is best for your business.
This tutorial will cover Shipping using Item priced shipping option.
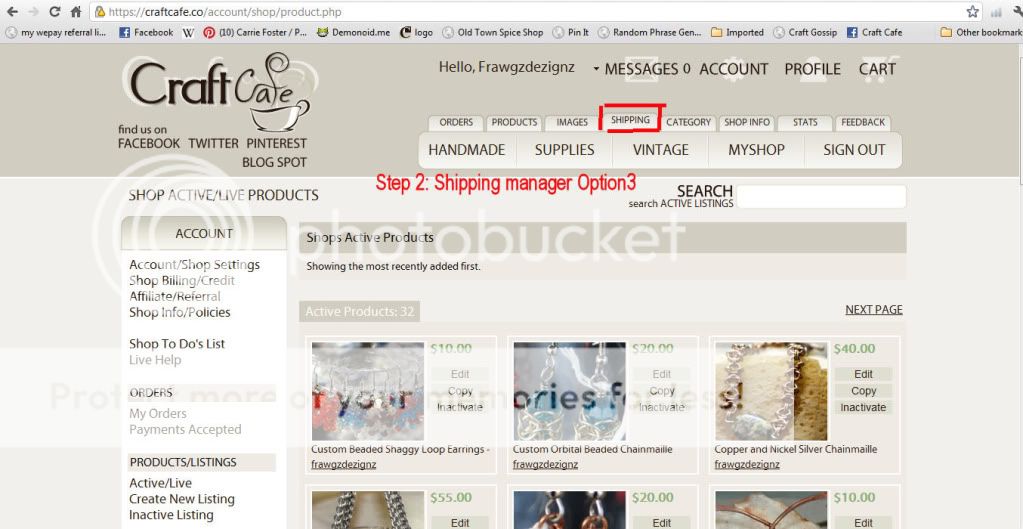
Log in, then click on the SHIPPING tab at the top of the page:

The next screen you get looks like this one, 
In the shipping method drop down choose ITEM PRICED SHIPPING!


To make sure your shipping shows up correctly for your buyer(s) click on the map of the USA in the above image and make sure it knows what state you're shipping items from.  (Make sure your home state is selected in the top of the screen you get after clicking on the US map)

Now to edit your listings:
You'll need to do this same thing with each listing you have up, and for every new listing you create hereafter (Until a batch process for this is finalized)
Go to PRODUCTS tab at the top of the page, that puts you in your shop admin area.

From there click on any item in your shop and choose EDIT - this brings up the edit item window.
LIKE SO:


Scroll down to the shipping area of the item, and for USA - type in the amount shipping costs for the 1st item in the 1st box, and the amount for a 2nd item would cost to ship in the 2nd box and click CLICK TO APPLY (Formerly ADD+ ) - if you don't click the CLICK TO APPLY (formerly ADD +) after each location you ship to - your shipping will not show up properly.
You'll get a listing like this - (yours will vary depending on where you ship to).


Then just finish out your listing hit update& publish and you're done.

If you wish to do item priced shipping you can do so using this method just enter 0.00 and 0.00 for each location you ship to including the CLICK TO APPLY.

Oh yeah if you choose to do shipping by item price you have to do every single listing manually. At this time there is no global shipping change option for single item priced shipping.
Sorry.

When you're done and want to check your items - you can have a friend who has an account log in and look at your items or you can email info@craftcafe.co and ask one of our admins to help verify your shipping is set up properly.

That's it you're done.


All rights reserved by CraftCafe LLC. Watermark theme. Powered by Blogger.