Many of you have asked for it here it is.
Zone shipping - flat rate priority mail for US AND International.
*NOTES**- USPS 1st class mail to all 50 states & territories is the same cost up to 13oz no matter where you ship from. (zone 1 US)
USPS First class mail international parcel is the same price for Canada/Mexico up to 13 oz. (zone 1 international)
USPS First Class Mail parcel is the same for all remaining countries up to 44 oz (zone 2 international)
USPS Priority Mail flat rate in each size box is the same to all 50 states & us territories - some weight restrictions (zone 1 US)
USPS Priority Mail flat rate in each size box is the same to Canada/Mexico - some weight restrictions (Zone 1 international)
USPS Priority Mail Flat rate in each size box is the same to all other countries (zone2 international)
---------------------------------------------------------------------------------------------------------
Now the tutorial:
Step 1 go to to the shipping tab at the top of the page - you'll bring up this screen - choose USPS Zone shipping - if you want to make sure its set reload the page - and it'll say 'Current: USPS Zone Shipping'.
Scroll down the page a bit - you'll come to this image - click where the image says CLICK HERE - do that
Clicking that link brings up this:
- make sure your home state is selected
(as you may have some stuff listed - click clear ALL values to start fresh)
Click ADD Default USPS Values - this is USPS 1st class ONLY for now
Approve this pop-up when it appears:
And you get this list of default USPS 1st class rates.
THIS tutorial is for shipping FLAT RATE ONLY - so the next steps from here will teach you just that!!
Note the add extra rows feature. - note the x's next to the rows - you can delete any rows you do not want or need. If you're doing flat rate ONLY - continue to the next step.
Just what the picture says - the amounts/weights are purely hypothetical for this tutorial - notice i've pared it down to 4 rates. One flat fee for up to 13oz, 1 fee for up to 16 oz, and so on.
YOU CHOOSE the weight limits based on how much you know you can get in the particular sized flat rate boxes.
-when you add a new row - you set the max weight for that price, the price, and the type of box/pkging, carrier and MAKE SURE TO CLICK UPDATE to save your work.
- to verify its done right click refresh rows on the left side of the table.
Go back to the shipping tab at the top of the page - look for this:
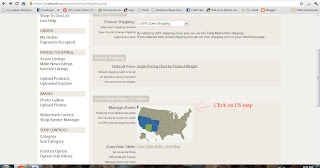
Click the US MAP you should get a blank like this:
- make sure your home state is selected in the drop down menu at the top of the section
- make sure that you're in zone 1 at the bottom and then click every state to add it to zone 1
click update map - and yours should look like this (Only your home state will be black instead of mine)
Go back to the shipping tab at the top (you'll get tired of me saying that by the time this is over)
Scroll down til you see this: (Click where it says CLICK HERE)
This is the window that comes up - make sure if you've been here before to start fresh and clear all values
If you've done your map right all 50 states will appear in the list like mine does here.
Click ADD Priority USPS default values - approve the pop up like you did for 1st class a few steps ago
this will populate a longer list: *NOTE the scroll bar on the right - the list goes to 70lb in increments
X out the ones you don't need. (you can just x out all of them and add new rows you need)
Here its not a weight range its UP TO a max weight. you choose max weight, price, you can edit all the fields here. CLICK UPDATE TO SAVE your edits.
It should look like this:
(again #s are hypothetical for tutorial only) - the priority mail prices in this table should match those in the other table you made earlier...but you can have more lines in the other table (1st class is in the other table)
If you don't ship internationally - you can stop here. Just make sure you have a weight entered for every item in your shop - checkout will add up the weights of the items and assign the shipping according to TOTAL weight.
----------------------------------------------------------------------------------------
International & flat rate shipping
Go back to the shipping tab at the top of the page:
Click on the international map
It will bring up something like this - except your's won't be filled in like mine -we'll get there.
Make sure you're in zone 1 - Click Canada & Mexico -
Move to zone 2 (tabs at bottom under map) - click through all the other countries you ship to (if its all of them your map will look similar to mine) I DO NOT SHIP to: Egypt, Libya, Italy or North Korea - due to import restrictions applied by those countries. - if you choose to not ship to a country don't click on it. If you click on it by accident you can undo it when you refresh the map by clicking the x next to the name of the country in the list under zone 2.
When you get to where you want it - (or where you think you want it) click update map. Any country you didn't click last time will be in gray. You can come back here during the next step to edit/add any countries you missed.
Now go back to the shipping tab at the top of the page
Scroll down to the bottom of the page and click where it says in this image:
That will bring up this: (Clear any values you may have entered already)
Then click where it says in this image:
Here's the full populated rate table for international - if you want to ship first class - international and have it stay correct leave the rates alone up to about 44oz - that's how much weight you can put in a USPS international 1st class parcel (package). After that it has to go USPS Priority Mail - though flat rate is more economical in most cases
See this image:
If you want and know your weight limits for packages (you should from the US part of the tutorial) you can edit the tables down to like I have done here: (Again this is purely hypothetical):
**NOTE** the two zones - and the countries listed under each (For FLAT RATE - if you have countries in zone 3 - note what they are, go back to the international map - and add those remaining countries to zone 2 - so you don't end up with randomly selected countries paying a higher rate.**
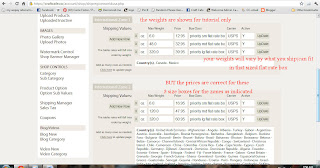
Like the image above this text says - the weights are for tutorial purposes ONLY and will probably not reflect your actual weight limits - BUT the prices ARE accurate for the type of boxes shown.
Click refresh rows - to verify your changes have been made.
If you're not sure if its right ask someone in another country to verify they see shipping in your listings - again you do need to enter a weight for each item. the cart will add up the weights of all items purchased from you and spit out a grand total weight and apply the appropriate shipping costs.
Complete the steps and you should be all set!
---Carrie - who is sorry this wasn't done sooner---


