Showing posts with label overview. Show all posts

6.17.2012

Tutorial: Product Options & Variants


Many sellers offer products that can be customized to their customer's individual liking without needing to list a ton of separate items. 

Using Craft Cafe's product options & variants section will help you the seller customize your listings to give your buyers the most product choices with the least amount of work.

Step 1 - point your browser to here: https://craftcafe.co/account/shop/variant.php
you'll get this screen:


Step 2 - You'll need to name your option(s). This tutorial shows me adding product options for my items - I do jewelry, photography and digital art. So your option names will differ from mine (or may be the same in some cases).
Make sure you click the ADD+ button once for each type of option you offer. [note at this time you can only pick one option type per listing]


Like the photo shows once you get all your option categories listed click the link at the top to go to the product values page - shown here:


If I click ADD+ next to anklet length - I can add an option variant to the list. See image below for my list of anklet lengths and more info for the next step. Make sure you click SAVE next to each variant. You can click ADD+ several times to get yourself a list of blank slots to add all at once and then click save after each - its just a flicker update not a page refresh so you don't have to worry about losing a lot of typed data
Description can be anything or you can leave it blank, examples: if you have fragrances you can give a description of each fragrance here or if its a t-shirt or skirt size you can give those details here.

Now when you get all your various options filled with variants and all are saved you can go in and edit an item and on the very last item of edit item or create new item page is the product option selection box.
Depending on your item click the drop down and select the option you have that applies to that item and finish your listing.

*Note if you have a special product option like higher end fragrances or something create a separate longer list for ones that include BOTH basic and higher end options - since at this time there isn't a way to add two options per listing yet.
-carrie-


Tutorial: Adding Your Social Media Links

Some of you have expressed difficulty in adding your social media links this simple tutorial will show you how

First point your browser here: https://craftcafe.co/account/shop/account.php
About 1/2 way down the page you'll get this - and I've highlighted the area for adding your social media links in red.

Type in your first link (Links shown here are for my links - use your own for your social media links):
See here:

And click ADD+ (brings up this):


Change the site name & link in the first row and hit add+ again adding a new link
Repeat as often as needed for however many links you wish to post:
Here is my completed list - this shows proper formatting for links as well.
If you've added an item and want to change the name or fix a link - REFRESH the page (ctrl+R - to reload) then it'll show the list in alphabetical order and give you the option to edit (UPDATE) or delete (X) your links.

They appear in alphabetical order - this is the only option - you can't arrange them to suit your preferences sorry:

That's it.
-Carrie-

6.14.2012

Tutorial: Shipping Item Priced Shipping (and free shipping)


This tutorial will cover some of the basics of getting into your shipping management area:

Shipping can be a pain in the butt for any business. Hopefully this tutorial will help you figure out what shipping option is best for your business.
This tutorial will cover Shipping using Item priced shipping option.
Log in, then click on the SHIPPING tab at the top of the page:

The next screen you get looks like this one, 
In the shipping method drop down choose ITEM PRICED SHIPPING!


To make sure your shipping shows up correctly for your buyer(s) click on the map of the USA in the above image and make sure it knows what state you're shipping items from.  (Make sure your home state is selected in the top of the screen you get after clicking on the US map)

Now to edit your listings:
You'll need to do this same thing with each listing you have up, and for every new listing you create hereafter (Until a batch process for this is finalized)
Go to PRODUCTS tab at the top of the page, that puts you in your shop admin area.

From there click on any item in your shop and choose EDIT - this brings up the edit item window.
LIKE SO:


Scroll down to the shipping area of the item, and for USA - type in the amount shipping costs for the 1st item in the 1st box, and the amount for a 2nd item would cost to ship in the 2nd box and click CLICK TO APPLY (Formerly ADD+ ) - if you don't click the CLICK TO APPLY (formerly ADD +) after each location you ship to - your shipping will not show up properly.
You'll get a listing like this - (yours will vary depending on where you ship to).


Then just finish out your listing hit update& publish and you're done.

If you wish to do item priced shipping you can do so using this method just enter 0.00 and 0.00 for each location you ship to including the CLICK TO APPLY.

Oh yeah if you choose to do shipping by item price you have to do every single listing manually. At this time there is no global shipping change option for single item priced shipping.
Sorry.

When you're done and want to check your items - you can have a friend who has an account log in and look at your items or you can email info@craftcafe.co and ask one of our admins to help verify your shipping is set up properly.

That's it you're done.


Tutorial: Shipping on Craft Cafe - Zone + weight US ONLY

Shipping can be a pain in the butt for any business. Hopefully this tutorial will help you figure out what shipping option is best for your business.

This tutorial will cover Shipping using the zone + weight calculation.

This assumes that you're just getting to the site and have no clue about shipping or where to find it. If you know how to find shipping skip to step 5.

To begin:  this is what you see when you are logged in and you go to the Craft Cafe Home page:

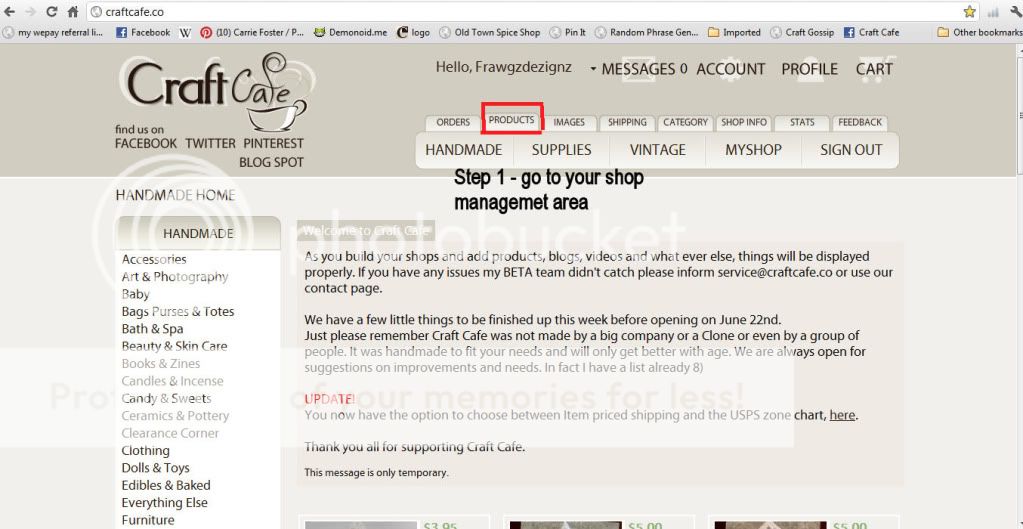
Step 1 - Access your shop admin area:


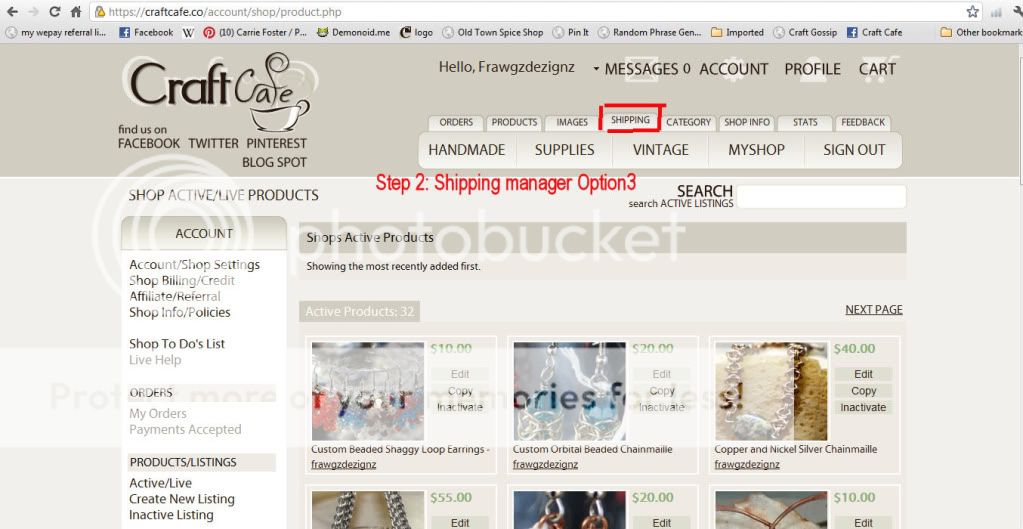
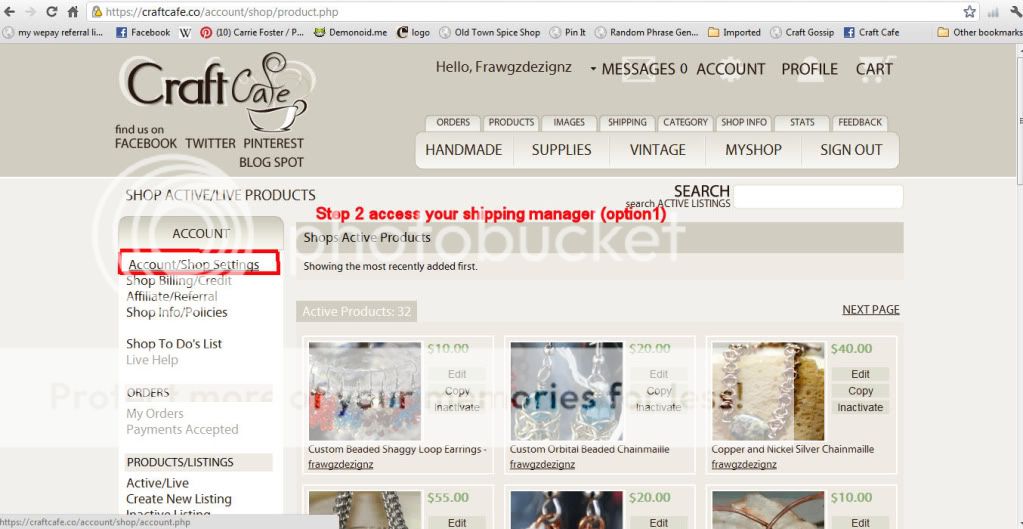
Step 2: There are 3 ways to go about changing or setting your shipping type (see 3 photos for directions)
Option1: Go to your shop admin area by clicking the PRODUCTS Tab at the top of the page as shown in this photo: 


Option 2: When in your shop admin area you can click on Shipping manager about 2/3 of the way down on the left hand side (you will have to scroll a bit to get to it) as shown in this photo:

Or Option 3: When in shop admin click on the Shipping tab at the top of the page:

Option 1 leads you to a page that looks like this:

Options 2 & 3 both take you here:

We'll be progressing through this tutorial using the screen from options 2 & 3 (the previous photo).

You can see from my page I have zone shipping selected...for this tutorial if you want to select zone shipping click so it has USPS Zone Shipping selected. [you'll get a tiny little blurb to the right that flickers to say UPDATED]

 Step 3: Choosing Zone Shipping will bring up this:
I live in Indiana - so that's what I choose for home state (you pick your home state, where you ship from).

(Ignore the fact I have default values showing in this screen cap please).

Step 4: Scroll down and you'll see a large blank area (- this assumes you have not set up this type of shipping before) as shown here: 

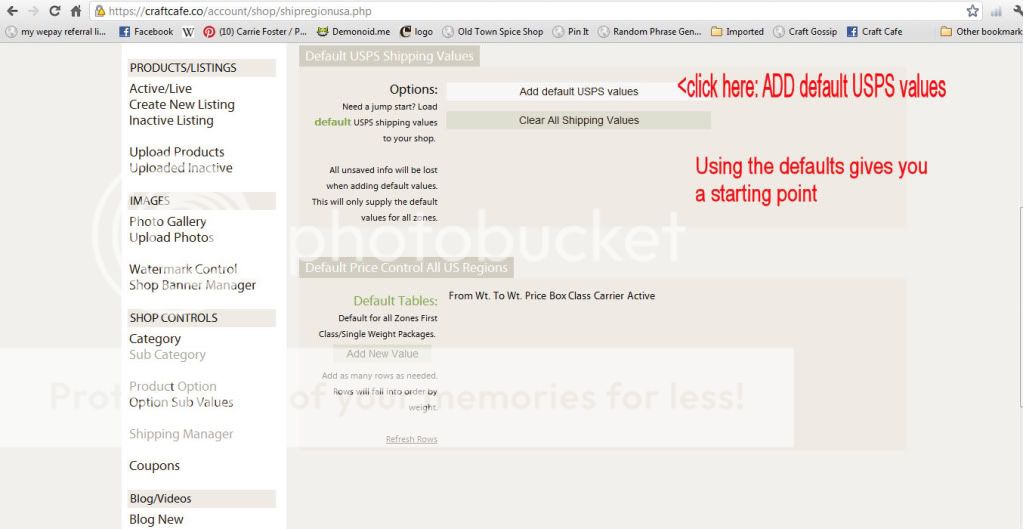
Step 5: About half way between the views in step 3 & step 4 you'll see this:
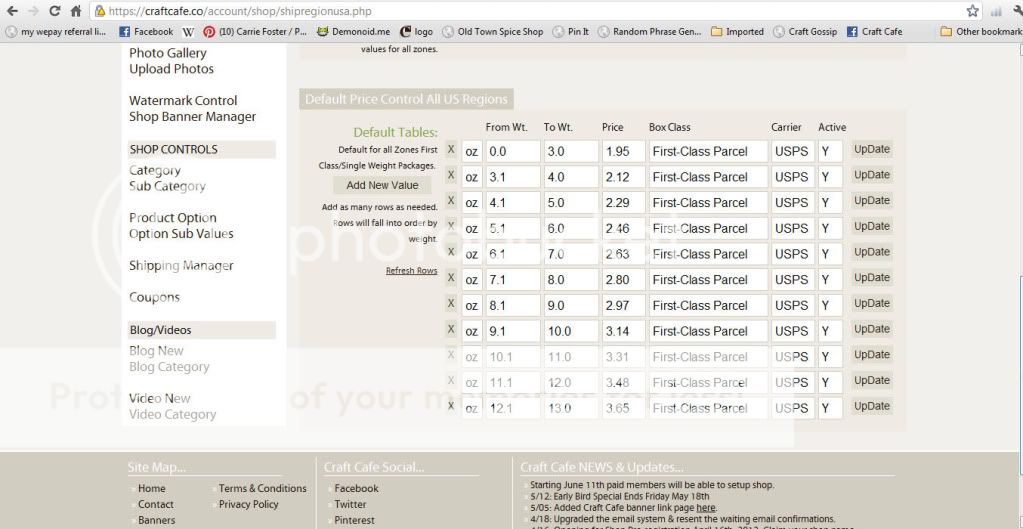
Click where the photo tells you to and it will populate a default USPS First class weight/price table.

Step 6: this is the result of you clicking the ADD default values from the last step:
Its a confirmation basically - - click the only option available at this point.

Step 7:  This populates the table with USPS default weights & prices. 
As shown this list only goes to 13oz  (USPS first class) but we can edit it as I'll show you in the next couple of steps.

Step 7B - adding rows to your default shipping values panel.
Say you have items that can really add up fast in weight. You don't want to undercharge your customer but you don't want to overcharge them either.

If you know you can ship say 3 bars of soap weighing over 13 oz but under 18oz and you want to use a small flat rate box you can add a line to represent from 13.1oz - 18oz
Click the Add new value (shown by red box)

This brings up this:

This step is purely hypothetical for my items but I'm doing it to show you how to do this:
it only gives you the higher end range of weights.
So for the purposes of this tutorial I'm going to say my upper limit for this next shipping weight range is 22oz the price is that of a USPS Small flat rate box with delivery confirmation $6.10 (See below for how I filled out the row. Make sure you click SAVE to save it.

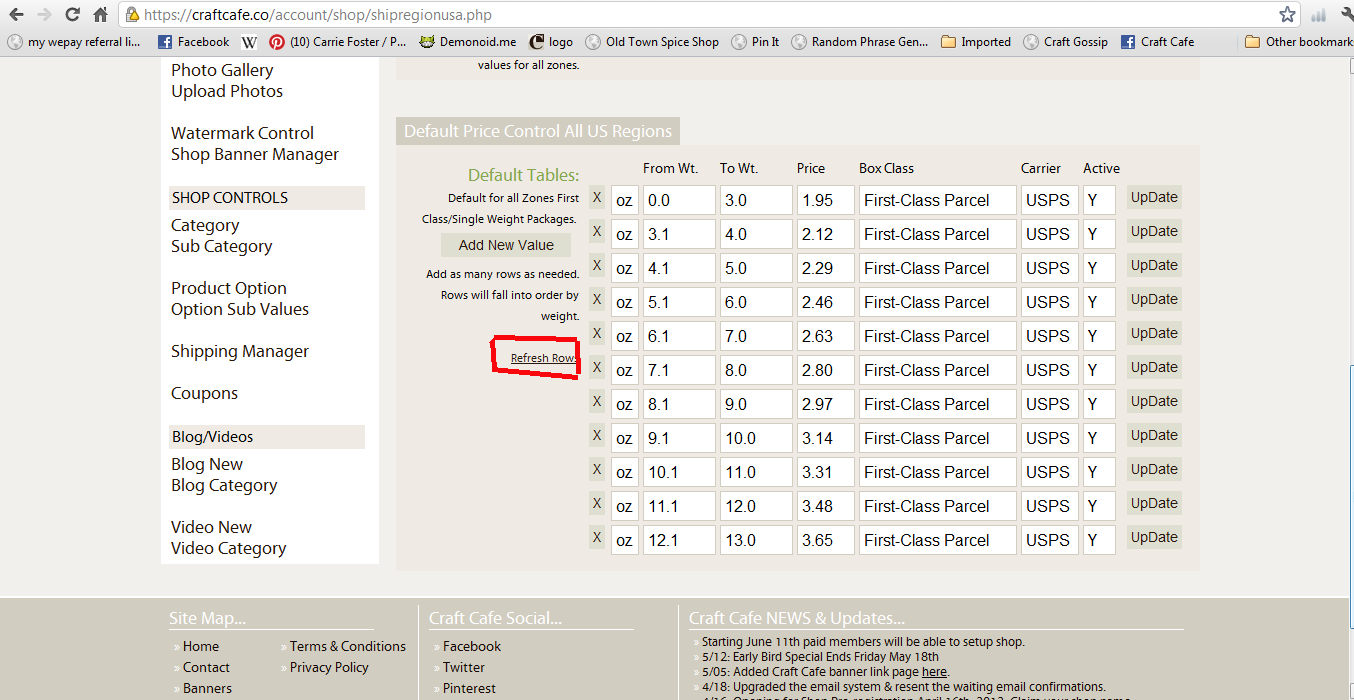
Now click refresh rows:


And you get:


If you want to add more values you just repeat the last 3 frames:
To save time and bandwidth I'm just showing how I added 3 types of flat rate boxes to the zone default shipping cost list. 


Notice there's only 3 values added to the list 3 types of flat rate boxes (these # are based on me helping someone earlier, yours will vary with how much you know you can fit in which box)

*Explanation Time* - Within the US if you're shipping 1st class up to 13 oz and flat rate priority ONLY - you don't really have to worry about setting up a lot of zones in the next steps. For you everything will be zone 1. It costs EVERYONE in the US the same flat fee to ship any package 1-13oz anywhere else in the US. And flat rate priority is just that - Flat rate for everyone.

If you're needing to do more intricate Non-flat rate shipping, your tutorial from here-on-out will be a lot more complicated & different. 

ONLY YOU know what your products weigh I can help where I can if you have the information to help me help you.


Now to set up your zones - everyone doing zone shipping will have to do this - but how detailed you get depends on whether you're doing flat rate like above or not.

Click shipping manager to the left:


This is your zone map without any states filled in:


If you're doing what I explained earlier about EVERYWHERE in the US has the same shipping fees - just go through and click all the states as zone 1. 


It should look like so:


All US states are blue - (except your home state) - this means everything ships for the same price everywhere but that the cost depends on the total weight of the package.


For International Shipping I will skip adding the map and things because that is a bit more complicated than I want to get into for this basic zone shipping tutorial. I will work out a more detailed international shipping for US to int locations tutorial later...

But that concludes US shipping by zones (the easy way).


Tutorial: Adding Products to your Craft Cafe Shop


As a new to Craft Cafe Seller many folks are having some confusion over how to set up a new listing manually. This tutorial will hopefully stop that from happening.
First you need to be a registered, paid seller to set up shop.

When you log in your screen looks like this:


You need to click on the products tab at the top of the page you'll see the tab labeled "PRODUCTS" is slightly raised above the others in the above image. Click that and you get this (but for your shop):


To create a new listing manually you need to click the CREATE New Listing from the left menu - see pink arrow.  Clicking that will give you this window:


Here you'll add your title, description, photos, price and so on. Widescreen limits - I can only fit so much on one photo grab. This shows a blank description, the photos section and the start of the categories portion. 

(This tutorial will walk you through a full listing with me adding an item to my shop.)

Title - **TIP** - Choose an appropriately named title for your item. Be accurate. Be concise. Long winded overly wordy titles are off putting to many customers - if they have to read 3 lines of text in the title they'll skip your item and move to the next.
Description - this is where you go into more detail about your item. Tell the customer anything about the item you yourself would want to know if you were buying the item from another seller (Sizes, measurements, colors, options, materials etc)


In the image above you can see I've added the title and description for the item I'm adding. Next up is photos. I'm showing a couple of photos here to give you examples and to show you the results of each:

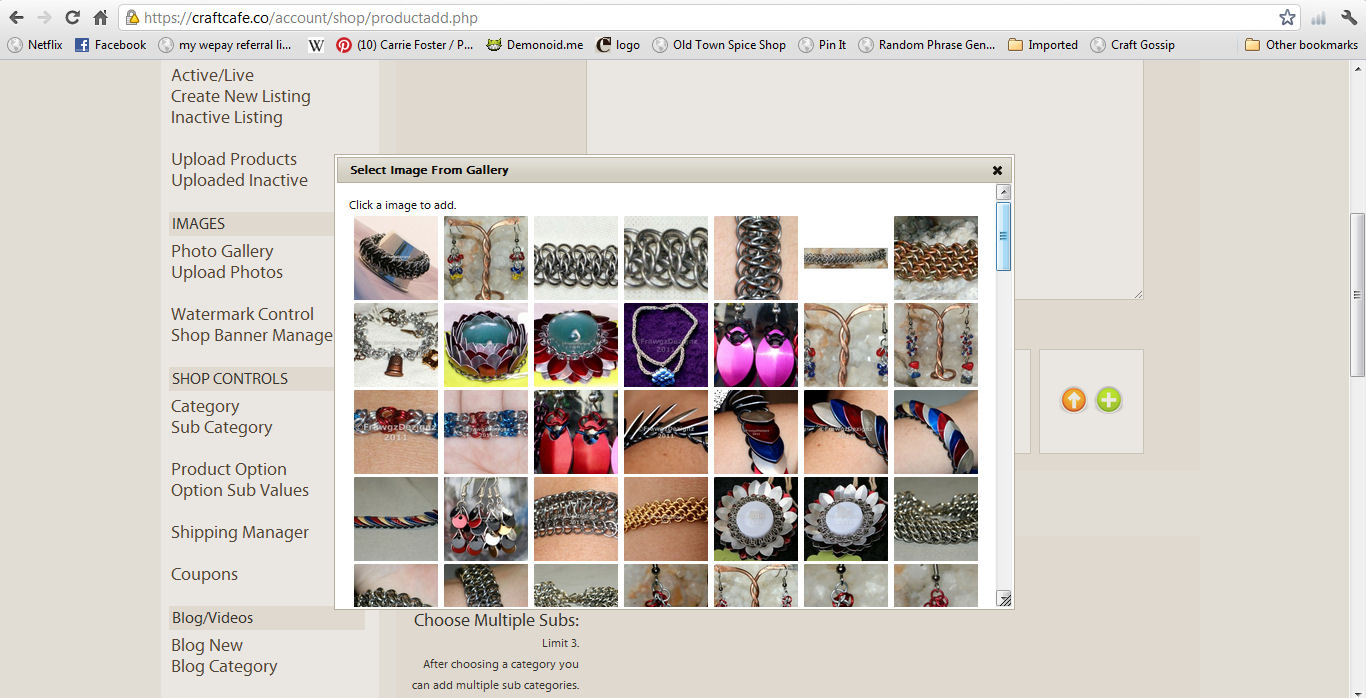
This photo - My mouse is hovering over the green (+) symbol to add an image from the gallery. If you've already done a mass upload of images you can click the green + to get your full gallery list of images.

The picture below shows my full gallery - it does not contain the images I need to use for the item in question for this tutorial. So I need to upload new images to my gallery. 


I close out the gallery and instead over over the orange UP arrow in the photos box. My mouse is hovering over the orange UP arrow getting the little hover text upload an image.

Click the orange upload an image arrow and you get this:


In the next photo you see I've added an item from my computer to the upload images area using the SELECT images button on the side of the uploader menu.
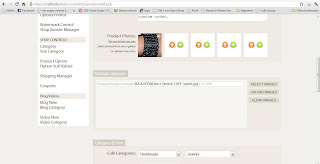
By clicking UPLOAD Images the text in the box changes slightly (Next photo will show my two uploaded images)

Both show "DONE" in the uploader section - you'll then go to the green + arrow and click it and pick them from the updated gallery (see pink arrow). The image below this one shows both images added to my listing.

Both images now uploaded and used for this listing:

Now we move on to categories, tags, pricing and more:
This image shows the option of Handmade for the only category. I only have paid for a handmade shop - this is the only main choice I will see. If you've paid for a handmade AND a supply shop you'll see both handmade and supply here.


The next image shows the main category choice menu (this item falls under jewelry - which is further down in the scroll list)


Next is sub categories: - this will vary by what main category you've chosen in the previous step.


Because this item is both bracelet & chaimaille I will choose bracelet (add) and Chainmaille (add)


Next image is keywords/tags:
As you can see I've added 5 keyword tags that fit the item I'm uploading. This also shows the shop category section. Here you choose where you want the item to be listed in your shop. Its Jewelry for me - so that's where it goes.


This last image shows Price, quantity, weight (how much does 1 of the item weigh with or without packaging - this ties into shipping which will be another tutorial), adjusted shipping (this can be handling, overhead, etc as determined by you the seller) (my packaged item weighs just under 3oz - my shipping table goes by whole nearest oz so 3 it is. My adjusted shipping $1 - this covers my ink to print labels, my gas costs and a bit to cover paypal's fees. I don't have any variants or coupons to add to this listing so I click Publish Product and viola!
Your listing is done!

Mine: 


Congratulations you can now list manually on Craft Cafe.
-Carrie- 
All rights reserved by CraftCafe LLC. Watermark theme. Powered by Blogger.